Example 11 - contour and XY plot

Example 11 - contour and XY plot |
|
To run this example, you must download the following files:
gsun11n.ncland then type:
gsn_code.ncl
u.cocos (data file)
ncl < gsun11n.ncl
| Frame 1 | Frame 2 |
|---|---|
| 
|
(Click on any frame to see it enlarged.)
  1. load "gsn_code.ncl"
  2.
  3. function addcyclic(data[*][*]:float)
  4. ;
  5. ; Add a cyclic point in "x" to a 2D array
  6. ; for a lat/lon plot "x"  corresponds to "lon"
  7. ;                    "ny" corresponds to "nlat"
  8. ;                    "mx" corresponds to "mlon"
  9. local dims, newdata, ny, mx, mx1
 10. begin
 11.     dims    = dimsizes(data)
 12.     ny      = dims(0)
 13.     mx      = dims(1)
 14.     mx1     = mx+1
 15.
 16.     newdata = new((/ny  ,mx1/),float)
 17.
 18.     newdata(:,0:mx-1) = data             ; pass everything
 19.     newdata(:,mx)     = (/ data(:,0) /)  ; value only
 20.
 21.     if((.not.ismissing(newdata!1)) .and. iscoord(data,newdata!1)) then
 22.         newdata&$newdata!1$(mx) = newdata&$newdata!1$(0)
 23.     end if
 24.
 25.     return(newdata)
 26. end
 27.
 28. begin
 29.   wks = gsn_open_wks("x11","gsun11n")  ; Open an X11 workstation.
 30.
 31.   cmap = (/(/1.,1.,1./), (/0.,0.,0./)/)  ; Change background to white
 32.   gsn_define_colormap(wks,cmap)          ; and foreground to black.
 33.
 34.   data     = asciiread("u.cocos",(/39,14/),"float")
 35.
 36.   pressure  = data(:,0)    ; First column of data is pressure (mb).
 37.   height    = data(:,1)    ; Second column is height (km).
 38.   u         = data(:,2:13) ; Rest of columns are climatological zonal winds
 39.                            ; (u: m/s)
 40.   unew = addcyclic(u)  ; Copy first point to end of array for continuity.
 41.
 42. ;----------- Begin first plot -----------------------------------------
 43.
 44.   resources = True
 45.
 46.   resources@tiMainString   = ":F26:Cocos Island"   ; Main title.
 47.   resources@tiYAxisString  = ":F25:Pressure (mb)"  ; Y axes label.
 48.
 49.   resources@sfYCStartV = max(pressure)   ; Indicate start and end of left
 50.   resources@sfYCEndV   = min(pressure)   ; Y axes values.
 51.
 52.   resources@trYReverse  = True    ; Reverse the Y values.
 53.   resources@trYLog      = True    ; Use log scale.
 54.
 55.   resources@tmXBMode      = "Explicit"   ; Define your own tick mark labels.
 56.   resources@tmXBLabelFont = 25           ; Change font of labels.
 57.   resources@tmXBLabelFontHeightF = 0.015 ; Change font height of labels.
 58.   resources@tmXBMinorOn   = False        ; No minor tick marks.
 59.   resources@tmXBValues    = ispan(0,12,1); Location to put tick mark labels
 60.                                          ; (13 points with January repeated).
 61.   resources@tmXBLabels    = (/"Jan","Feb","Mar","Apr","May","Jun",\
 62.                               "Jul","Aug","Sep","Oct","Nov","Dec","Jan"/)
 63.
 64.   resources@tmYUseLeft    = False      ; Keep right axis independent of left.
 65.   resources@tmYRLabelsOn  = True       ; Turn on right axis labels.
 66.   resources@tmYRLabelFont = 25         ; Change font of labels.
 67.   resources@tmYROn        = True       ; Turn on right axis tick marks.
 68.   resources@tmYRMinorOn   = False      ; No minor tick marks.
 69.
 70.   resources@tmYRMode      = "Explicit"  ; Define own tick mark labels.
 71.   hnice = fspan(0.,22.,12)              ; Set range of "nice" height values.
 72.   pnice = ftcurv(height,pressure,hnice) ; Calculate "nice" pressure values.
 73.   resources@tmYRValues    = pnice       ; At each "nice" pressure value,
 74.   resources@tmYRLabels    = hnice       ; put a "height" value label.
 75.
 76.   resources@tmYLMode      = "Explicit" ; Define own tick mark labels.
 77.   resources@tmYLLabelFont = 25         ; Change the font.
 78.   resources@tmYLValues    = (/1000.,  800., 700., 500., 400., 300., \
 79.                                250.,  200., 150., 100.,  50./)
 80.   resources@tmYLLabels    = (/"1000","800","700","500","400","300", \
 81.                                "250","200","150","100", "50"/)
 82.   resources@tmYLMinorOn   = False        ; No minor tick marks.
 83.
 84.   resources@cnFillOn          = True  ; Turn on contour level fill.
 85.   resources@cnMonoFillColor   = True  ; Use one fill color.
 86.   resources@cnMonoFillPattern = False ; Use multiple fill patterns.
 87.
 88.   resources@cnLineLabelAngleF = 0. ; Draw contour line labels right-side up.
 89.   resources@cnLevelSpacingF   = 1.0
 90.
 91.   resources@gsnDraw  = False  ; Don't draw the plot or advance the
 92.   resources@gsnFrame = False  ; frame in the call to gsn_contour.
 93.
 94.   contour = gsn_contour(wks, unew, resources)  ; Create a contour plot.
 95.
 96.   getvalues contour           ; Retrieve contour levels.
 97.     "cnLevels"   : levels
 98.   end getvalues
 99.
100.   patterns  = new(dimsizes(levels)+1,integer) ; Create array for fill
101.   patterns(:)  = -1 	                      ; patterns and initialize
102.                                               ; it to transparent.
103.
104.   do i=0,dimsizes(levels)-1         ; Fill contour levels depending on
105.     if(levels(i).le.-6.) then       ; different criteria.
106.       patterns(i) = 5               ; Hatching
107.     else
108.       if(levels(i).gt.0.) then
109.         patterns(i) = 17            ; Stipple
110.       end if
111.     end if
112.   end do
113.   patterns(i)  = 17 ; last pattern
114.
115.   setvalues contour    ; Set the new patterns and make them more dense.
116.     "cnFillPatterns" : patterns
117.     "cnFillScaleF"   : 0.8
118.   end setvalues
119.
120.   draw(contour)  ; Draw the contour plot.
121.
122.   txres               = True    ; Annotate plot with some text.
123.   txres@txFontHeightF = 0.015
124.   gsn_text_ndc(wks,":F25:U Component",  .270,.815,txres)
125.   gsn_text_ndc(wks,":F25:(m-s:S:-1:N:)",.765,.815,txres)
126.
127.
128.   txres@txFontHeightF = 0.025   ; Label right Y axis.
129.   txres@txAngleF      = 90.
130.   gsn_text_ndc(wks,":F25:Height (km)",.89,.5,txres)
131.
132.   frame(wks) ; Advance the frame.
133.
134. ;----------- Begin second plot -----------------------------------------
135.
136.   delete(resources) ; Start with new list of resources.
137.
138.   resources = True
139.   resources@tiMainString  = ":F26:Cocos Island"
140.   resources@tiXAxisString = ":F25:Month"
141.   resources@tiYAxisString = ":F25:Amplitude (m/s)"
142.
143.   resources@tmXBMode      = "Explicit"   ; Define your own tick mark labels.
144.   resources@tmXBLabelFont = 25           ; Change font of labels.
145.   resources@tmXBLabelFontHeightF = 0.015 ; Change font height of labels.
146.   resources@tmXBMinorOn   = False        ; No minor tick marks.
147.   resources@tmXBValues    = ispan(0,12,1); Values from 0 to 12.
148.   resources@tmXBLabels    = (/"Jan","Feb","Mar","Apr","May","Jun",\
149.                               "Jul","Aug","Sep","Oct","Nov","Dec","Jan"/)
150.
151.   xy = gsn_xy(wks,ispan(0,12,1),unew,resources) ; Create and draw an XY plot.
152.
153. end
function addcyclic(data[*][*]:float)
    . . .
    return(newdata)
end
Define a function to make the data cyclic. This function is described
in more detail in example 9.This function may produce the following warning message:
warning:Dimension (1) has not been definedwhich you can safely ignore. This warning is coming from the partial statement in line 21 that reads:
ismissing(newdata!1)
newdata doesn't have any named dimensions, so the syntax
newdata!1 is causing the warning message.
beginBegin the main program of the NCL script.
  data     = asciiread("u.cocos",(/39,14/),"float")

  pressure  = data(:,0)
  height    = data(:,1)
  u         = data(:,2:13)
The data in the ASCII file "u.cocos" are in 14 columns by 39 rows,
where the first column contains pressure values (millibars), the
second column contains height values (kilometers), and columns 3-14
contain the zonal wind values (m/s). Columns 3-14 represent months of
the year.Read these values with the function asciiread into a 2-dimensional float array called data that is dimensioned 39 x 14, and then extract the first two columns of data to 1-dimensional float arrays pressure and height, and the rest of the columns to a 2-dimensional array u (dimensioned 39 x 12).
unew = addcyclic(u)Using the function addcyclic that you defined above, add a "cyclic" point to u and call the new array unew. Since the dimension of u is 39 x 12, unew will be dimensioned 39 x 13.
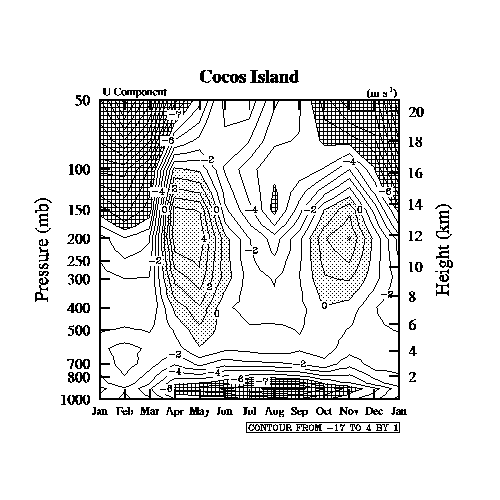
;----------- Begin first plot -----------------------------------------Draw a contour plot of unew. Label the left Y axis with pressure values (using log scaling), the right Y axis with height values (using linear scaling), and the X axis with strings representing the months of the year. Fill the contour levels that are less than -6.0 with one pattern, the contour levels greater than 0.0 with another pattern, and leave the contour levels between values -6.0 and 0.0 unfilled.
  resources@sfYCStartV = max(pressure)
  resources@sfYCEndV   = min(pressure)
Set these two resources to indicate the minimum and maximum values of the Y axis.
  resources@trYReverse  = True
  resources@trYLog      = True
Set the Transformation resource trYReverse to True to reverse the Y axis values, and the LogLinTransformation trYLog resource to True to indicate you want log scaling in the Y direction.
Transformation resources are described in more detail in example 7.
  resources@tmXBMode      = "Explicit"
  resources@tmXBLabelFont = 25
  resources@tmXBLabelFontHeightF = 0.015
  resources@tmXBMinorOn   = False
  resources@tmXBValues    = ispan(0,12,1)

  resources@tmXBLabels    = (/"Jan","Feb","Mar","Apr","May","Jun",\
                              "Jul","Aug","Sep","Oct","Nov","Dec","Jan"/)
By setting the TickMark resource
tmXBMode to "Explicit", NCL uses the array resource
tmXBValues to determine the coordinate positions of the major
tick marks, and tmXBLabels to determine the labels to put at
each of the coordinate positions specified by tmXBValues. In
lines 58-59 above, you are indicating you want
major tick marks at values 0, 1, 2, . . ., 12 on the X axis, and the
labels "Jan, "Feb", "Mar", . . ., "Jan" at each of these tick
marks.Note: You must set the tick mark values in the same data space that you have set up the corresponding axis to be. Since you did not explicitly define the limits of the X axis, the minimum value defaults to 0 and the maximum value defaults to n-1, where n is the number of points in the X direction. In this case, n is 13 because in the call to gsn_contour below, you are contouring unew which has 13 points in the X direction.
  resources@tmYUseLeft    = False
  resources@tmYRLabelsOn  = True
  resources@tmYRLabelFont = 25
  resources@tmYROn        = True
  resources@tmYRMinorOn   = False
Set tmYRLabelsOn and tmYROn to True to label the right Y axes (which by default is not labeled at all). By default, if you set these resources to True, then whatever you set for the left Y axis is done for the right Y axis. To make the right Y axis independent of the left Y axis, set tmYUseLeft to False.
The resources tmYRLabelFont and tmYRMinorOn change the font and turn off minor tick marks for the right Y axis.
  resources@tmYRMode      = "Explicit"
  hnice = fspan(0.,22.,12)
  pnice = ftcurv(height,pressure,hnice)
  resources@tmYRValues    = pnice
  resources@tmYRLabels    = hnice
The height values read in from the data file are specified at decreasing and unequally spaced pressure values (verify this with print(pressure)). Use the Fitgrid routine ftcurv, to interpolate the pressure values at equally spaced height values.
The first argument of ftcurv is a 1-dimensional array of any size (npts) containing the abscissae for the input function, and the second argument is a 1-dimensional array containing the npts functional values of the input function. The third argument is a 1-dimensional array (size npts2) containing the abscissae for the interpolated values. In this case, you are passing hnice for the third argument, which contains 12 equally spaced values from 0 to 22 in increments of 2 (returned from the fspan function). These "nice" height values are used because the actual height values go from 0.11 to 20.66 (which you can verify with print(min(height)) and print(max(height)). ftcurv returns a 1-dimensional array of size npts2 that contains the interpolated function values at the points specified by the third argument passed to it.
Now that you have interpolated pressure values at "nice" height values, use these two arrays to specify the locations and labels for the tick marks on the right Y axis.
  resources@tmYLMode      = "Explicit"
  resources@tmYLLabelFont = 25
  resources@tmYLValues    = (/1000.,  800., 700., 500., 400., 300., \
                               250., 200., 150., 100., 50./)
  resources@tmYLLabels    = (/"1000","800","700","500","400","300", \
                               "250","200","150","100", "50"/)
  resources@tmYLMinorOn   = False
Set tmYLMode to "Explicit" to set the tick marks and labels
for the left Y axis using the resource arrays tmYLValues and
tmYLLabels. Don't forget, you reversed the Y axis by setting
trYReverse to True, so you need to set the left Y
axis labels and tick marks accordingly.
  resources@cnFillOn          = True
  resources@cnMonoFillColor   = True
  resources@cnMonoFillPattern = False
Turn on contour fill and indicate that you want multiple fill patterns instead of solid fill.
resources@cnLineLabelAngleF = 0.Set cnLineLabelAngleF to 0.0 to keep the contour line labels from being rotated. This resource has a default of -1.0, which causes line labels to be angled in the direction of the tangent of the contour line at the location of the label.
resources@cnLevelSpacingF = 1.0Set the contour level spacing to 1.0.
resources@gsnDraw = FalseThe resource gsnDraw is another resource that is specific to the gsn_* suite of plotting functions. By setting this to True, you are indicating that you don't want the plotting function (gsn_contour in this case) to draw the plot. This is done so that you can retrieve a resource from the plot after it is created and set some other resources based on the one you retrieved (more on this below) before drawing the contour plot.
resources@gsnFrame = FalseSince you don't want gsn_contour to draw the plot, you don't want it to advance the frame either, so set gsnFrame to False.
contour = gsn_contour(wks, unew, resources)Create a contour plot of unew. Since you set gsnDraw to False, no plot is drawn at this point.
  getvalues contour
    "cnLevels"   : levels
  end getvalues
Now that you've created the contour plot, use the getvalues
statement to retrieve the contour level values (cnLevels)
that were calculated based on the data you passed to
gsn_contour. The getvalues statement is described
in more detail in example 4.
  patterns  = new(dimsizes(levels)+1,integer)
  patterns(:)  = -1


  do i=0,dimsizes(levels)-1
    if(levels(i).le.-6.) then
      patterns(i) = 5
    else
      if(levels(i).gt.0.) then
        patterns(i) = 17
      end if
    end if
  end do
  patterns(i)  = 17
As described in example 5, there
is always one more fill area than there are contour levels. Create a
new integer array called patterns that contains one more
element than the levels array that you retrieved in lines 96-98, and use it to specify the fill patterns that you
want for each level. You are initializing this array to pattern index
-1 (transparent), and then in the if-else-end if statement,
you are setting the pattern to index 5 (a cross hatch pattern) if the
corresponding contour level value is less than or equal to -6.0, and
to index 17 (a stipple pattern)
if the corresponding contour level value is greater than 0.0.
  setvalues contour
    "cnFillPatterns" : patterns
    "cnFillScaleF"   : 0.8
  end setvalues
Now that you have filled the patterns array with the fill pattern
indices that you want for the various contour levels, use the setvalues
statement to set the cnFillPatterns resource to this array and to
change the default value of cnFillScaleF from 1.0 to 0.8 to
make the patterns more dense. setvalues is described in more
detail in example 9.
draw(contour)Now draw the contour plot with a call to draw.
  txres               = True
  txres@txFontHeightF = 0.015
  gsn_text_ndc(wks,":F25:U Component",  .270,.815,txres)
  gsn_text_ndc(wks,":F25:(m-s:S:-1:N:)",.765,.815,txres)
Put two titles at the top of the plot (one on the left and one on the right) with calls to gsn_text_ndc. The partial string ":F25" is a text function code that changes the font to "Times-Roman".
  txres@txFontHeightF = 0.025
  txres@txAngleF      = 90.
  gsn_text_ndc(wks,":F25:Height (km)",.89,.5,txres)
Label the right Y axis with a call to gsn_text_ndc. By setting txAngleF to 90.0, you are rotating the string 90 degrees counter-clockwise (the default is no rotation).
frame(wks)Advance the frame of the workstation.
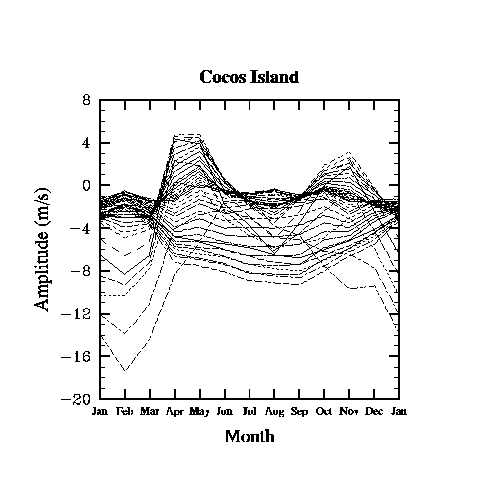
;----------- Begin second plot -----------------------------------------Create an XY plot to draw slices of the unew data.
delete(resources)Since the resources you previously set were for a contour plot, start over with a new list of resources for an XY plot.
  resources@tmXBMode      = "Explicit"
  resources@tmXBLabelFont = 25
  resources@tmXBLabelFontHeightF = 0.015
  resources@tmXBMinorOn   = False
  resources@tmXBValues    = ispan(0,12,1)
  resources@tmXBLabels    = (/"Jan","Feb","Mar","Apr","May","Jun",\
                              "Jul","Aug","Sep","Oct","Nov","Dec","Jan"/)
Label the X axis with strings indicating the month of the year, just
as you did for the contour plot in this example.
xy = gsn_xy(wks,ispan(0,12,1),unew,resources)To draw slices of unew at every Y value in unew, just pass the whole unew array to the gsn_xy routine. The X values that you are plotting unew against are just the months of the year, so use ispan(0,12,1) to pass in X values of 0, 1, . . ., 12.
endEnd the main program of the NCL script.