ElVis

ElVis
Scientific Graphics for Visualization and Monitoring

ElVis displays graphs of data from a variety of sources.  Users can explore the data and output publication quality PostScript and PDF files.  ElVis can display and animate several graph windows simultaneously.  The software is written in Java for portability.  Long running simulations can be monitored by running ElVis and selecting data from its internal browser. 
ElVis is developed by Eliot Feibush at PPPL.

ElVis Launcher 
Download and run this launcher program to install ElVis, check for new versions, and run ElVis with increased memory.  This Java program also checks for the right version of Java on your computer.  Initially, it installs the latest version of ElVis in the "Elvis" directory in your home directory.  The launcher then runs ElVis with the amount of memory you specify.  Subsequently, when you run the launcher, it checks to see if a new version of ElVis is available.  The latest version is dated 9/20/2017.  The version date is shown in the title bar.  Update information is available from the toolbar menu under Help-->What's new.


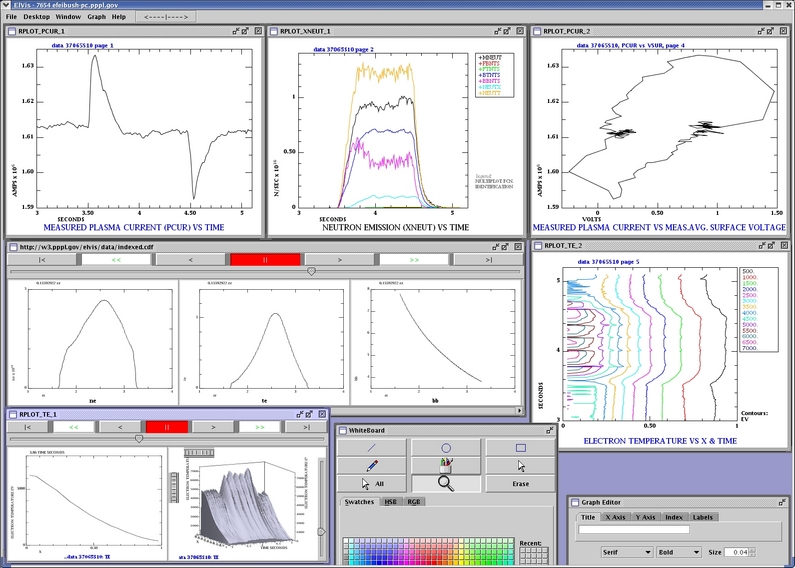
Integration with RPLOT
ElVis can display graphs generated by RPLOT.  Go to Running RPLOT with ElVis for instructions and examples.


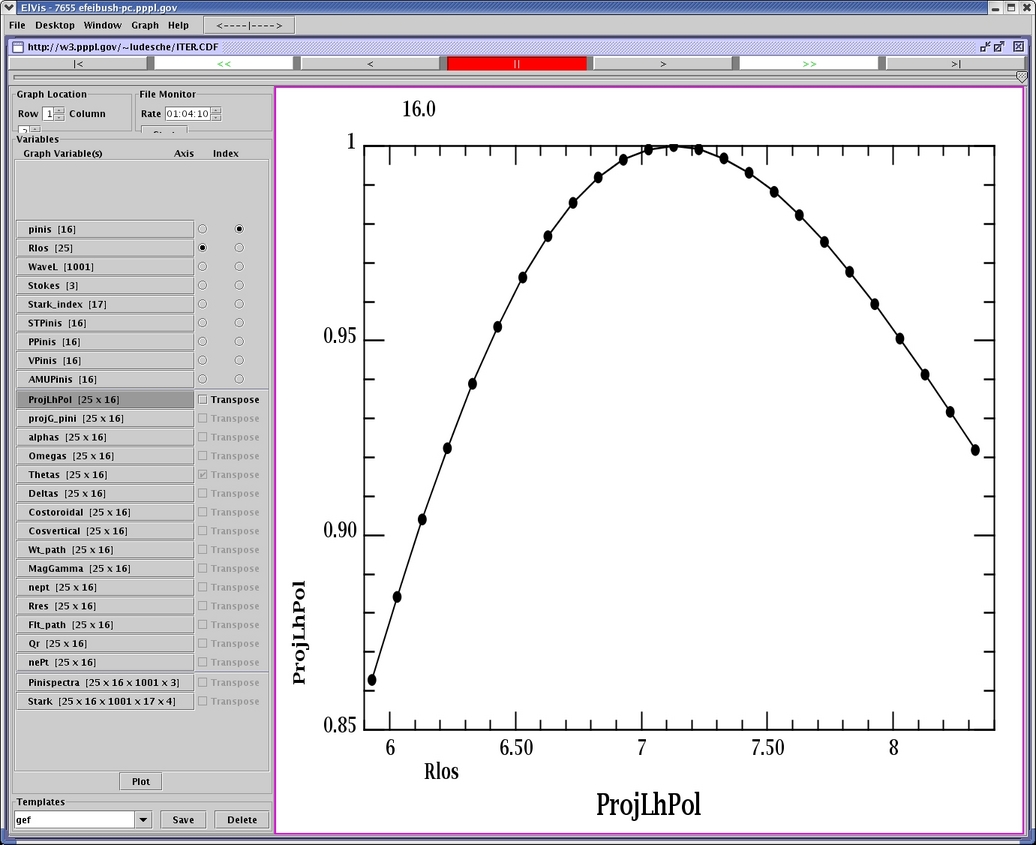
Getting Started with the Graphical Interface
You can display a sample graph and interact with it.  Go to File-->Browse URL.  This brings up a file selection box.  Click on xneut.cdf to load a typical graph.  Try some interactions:

Zoom - click in the graph and drag the selection rectangle to zoom in on the data.  You can also move the cursor into the graph and type the '=' key to zoom in or the '-' key to zoom out.  Type the letter 'a' to reset.
   

Scroll - move the cursor into the graph and type the arrow keys to scroll vertically or horizontally.
   
Numeric Values - hold down the cursor below the X axis and drag to display a vertical crosshair with the numeric value of each variable.
   

Resize - hold down mouse button 3 (MB3) to get the pop-up menu.  Select Max & Fill to enlarge the graph window.  Select Restore to return the window to its original size.

To look at some 2-D data, go to File-->Browse URL and select indexed.cdf.  This will display a window with 3 indexed graphs.  There are VCR buttons along the top of the window and a slider below these buttons.  Drag the slider to change the index of the 3 graphs.  The VCR buttons are:
   |<     Jump to the lowest index.
    <<    Sequentially display the datasets by decrementing the index.
    <      Decrement the index by 1.
    ||       Stop the animation.
    >       Increment the index by 1.
    >>    Sequentially display the datasets by incrementing the index.
    >|     Jump to the highest index.


netCDF Files in ElVis
    ElVis can read netCDF files and display the data stored in variables.  If the netCDF file is stored as a URL on a website then go to File-->Browse URL.  
This brings up a Load URL browser window for navigating to the netCDF URL.  Click on a link or type a new address in the textfield and press the Enter key.  A file located in a directory that is served by an HTTP server is accessible as a URL.  The file must be publicly readable, e.g. in Unix the file permission must contain r--r--r.

    If the netCDF file is stored as a file on disk then run ElVis as an application and go to File-->Load File. Set "Files of Type" to ".cdf, .nc files" if it is not already set in the Load File window.


  When you click on the name of the netCDF file, ElVis displays a GraphWindow containing the list of variables and an empty graph.  The long name of each variable is shown unless only the short name is in the file.  The dimensions of each variable indicate the arrangement and number of its data elements.  For example, a one-dimensional variable with 201 elements would be:  Distance [201].  A two-dimensional variable would be:  omegas [25 x 16].  The panel for configuring a plot is shown below.

    To select a one-dimensional variable for plotting, click on the name of the variable.  Then select a 1-D variable as the X Axis by clicking on a radio button.  Then click on the Plot button below the list of variables.  Multiple variables can be selected by using Ctrl-Click on the name of each variable; then click on Plot.  If the variable to be plotted has more elements than the variable for the axis then additional axis locations are created by interpolation.  If the plotted variable has fewer elements then the axis variable is point sampled for each of the plotted elements.

    Selecting one or more two-dimensional variables for plotting will activate the second column of radio buttons for the Index.  When plotting 2-D variables, select a 1-D variable for the X Axis and a 1-D variable for the Index.  A 2-D variable listed as [25 x 16] is plotted as 16 indexed datasets with 25 values in each dataset.  The index value is shown above the animated graph or in the legend when the data is presented as f(x,i).  The pop-up menu (click on mouse button 3 or type F9 when the cursor is over the graph) has an item for Presentation that lets you choose either Animated, f(x,i), Surface plot, or Contour plot.  Clicking the checkbox for Transpose would plot this variable as 25 indexed datasets containing 16 values in each dataset.  Multiple 2-D variables can be selected by using Ctrl-Click and then Plot.

netcdfpanel

    Selecting a variable with 3 or more dimensions brings up a dimension pull-down selector for the X Axis and the Index and textfields for setting index values as shown below.  Choose a different dimension from both of the pull-down selectors.  These 2 dimensions will form a 2-D variable to be plotted.  The corresponding 2 textfields will be grayed-out and inactive.  The remaining, active textfields are used to select the 2-D "slice" from the variable.  Set the index number for each of these dimensions to specify a two-dimensional subset of the entire variable.  Type in the index number or use the spinner UI to increment/decrement the index number. Then click Plot.  Extracting the data from a large file over the Internet can take several minutes.

netcdfslice

    Several graphs can be drawn for a netCDF file.  Go to Window-->Add Row or Window-->Add Column to add more cells to the GraphWindow.  Click in a cell to set the location of the next plot.

    netCDF Graph Templates
       The configuration of a GraphWindow for a netCDF file can be saved and restored with a template file.  This is useful for redisplaying a set of graphs without having to manually reconfigure the window and choose variables.  Templates also enable comparing data from several different files with variables of the same name and number of dimensions.  It also lets other users look at graphs created by a collaborator.  The template contains the number of rows and columns and the variables that form each graph.  Run ElVis as an application to save and load templates as files on disk.  An Elvis directory is created for templates in the user's home directory.  To create a template, enter its name in the visible field of the pull down selector for Templates as shown below.  Then click Save.  Use the pull-down selector to load a template from the directory of available templates.  Click Delete to delete the current template.

template

    When a netCDF file is downloaded using Browse-->URL, ElVis checks the URL directory for a corresponding template file.  If the template is there then ElVis automatically downloads the template and applies it to the GraphWindow.  This will display the graphs with the variables as specified in the template.  For example, if you browse for sim1.cdf then ElVis will also look for sim1.cdft as the template.  If a corresponding template is not found, then ElVis checks the netCDF file for a global attribute named "elvis_template" and loads this template.

    Monitoring netCDF Files
       Long running simulations or analysis programs can be monitored through netCDF files.  A program may add data to a file as it runs.  A simulation typically writes data after each time step.  After loading a netCDF file, ElVis can periodically poll the file, check for additional data, and update the graphs.  The polling rate is set with the digital clock user interface that shows hours:minutes:seconds.  Highlight part of the time interval and use the spinner to increment or decrement the polling frequency.  Click on Start to begin monitoring.  The button will then change to Stop to end monitoring.

       If the file has a global attribute named "running" that is set to true, then ElVis will automatically start monitoring the file when it is loaded.  When the simulation changes running to false then ElVis will automatically stop monitoring.  The polling frequency is stored in the template file.  Here is a sample program for creating a netCDF file that ElVis can monitor.


 Gnuplot data in ElVis
    ElVis can display data that is formatted for gnuplot. 
See these instructions.

Presentations

ElVis Documentation

    Links to ElVis programming interfaces available to application programs. 
    Description of graphs.
    Interactive features.


Elfresco - The Full Wave Reflectometer Simulation Code is an application that uses ElVis for displaying graphs.